
So, you’re thinking about growing your own microgreens at home? It’s a fantastic idea! These little powerhouses of nutrition are surprisingly easy to cultivate, even if you don’t have a lot of space or a green thumb. We’re going to walk through everything you need to know, from getting your setup ready to harvesting those vibrant little leaves and adding them to your meals. Get ready to bring a fresh, healthy boost right into your kitchen.
Key Takeaways
- Growing microgreens at home is a simple process that requires minimal space and equipment.
- Microgreens are harvested young, typically when their first true leaves appear, usually within 7-21 days.
- Proper harvesting involves cutting the greens at soil level with sharp scissors.
- Store harvested microgreens in an airtight container in the refrigerator for up to a week.
- Microgreens can be easily incorporated into salads, soups, sandwiches, and smoothies for added flavor and nutrition.
Understanding Microgreens
So, you’re curious about microgreens? That’s great! They’ve become super popular lately, and for good reason. Think of them as tiny, super-powered versions of your favorite vegetables and herbs. They’re not just a pretty garnish; these little guys pack a serious punch in terms of flavor and nutrients.
What Are Microgreens?
Microgreens are essentially baby plants. We’re talking about vegetable or herb seedlings that are harvested really early, just after they’ve grown their first set of true leaves. The key is that they’re grown densely, not spaced out like you would for a mature plant. This results in a concentrated burst of flavor and a whole lot of goodness in a tiny package. You’ll see them used in all sorts of dishes, from livening up a salad to being the star of a fancy appetizer. They really are a concentrated dose of what their mature counterparts offer.
Microgreens vs. Sprouts: Key Differences
It’s easy to mix up microgreens and sprouts, but they’re actually quite different. Sprouts are grown entirely in water and harvested super young, usually within a few days, before they even develop leaves. They’re basically just germinated seeds. Microgreens, on the other hand, need a growing medium like soil and light. They’re harvested a bit later, typically between one to three weeks, once they have their first true leaves. And here’s another big difference: with sprouts, you eat the whole thing – seed, root, and shoot. For microgreens, we only harvest the stem and leaves, leaving the roots behind in the soil. It’s a pretty simple distinction once you see them side-by-side.
- Sprouts: Grown in water, harvested in 3-5 days, eat the whole plant.
- Microgreens: Grown in soil/medium with light, harvested in 7-21 days, eat stem and leaves.
The Nutritional Powerhouse of Microgreens
Don’t let their small size fool you. Microgreens are packed with nutrients. Studies have shown that they can contain significantly higher concentrations of vitamins, minerals, and antioxidants compared to their mature plant versions. This makes them a fantastic addition to your diet, especially if you’re looking to boost your intake of essential nutrients without adding a lot of volume to your meals. They’re a simple way to add a healthy boost to almost anything you eat.
The concentration of nutrients in microgreens is remarkable. In that small, tender leaf, you’re getting a dense package of vitamins like C, E, and K, along with beta-carotene and other beneficial compounds. It’s like getting a super-concentrated dose of plant power.
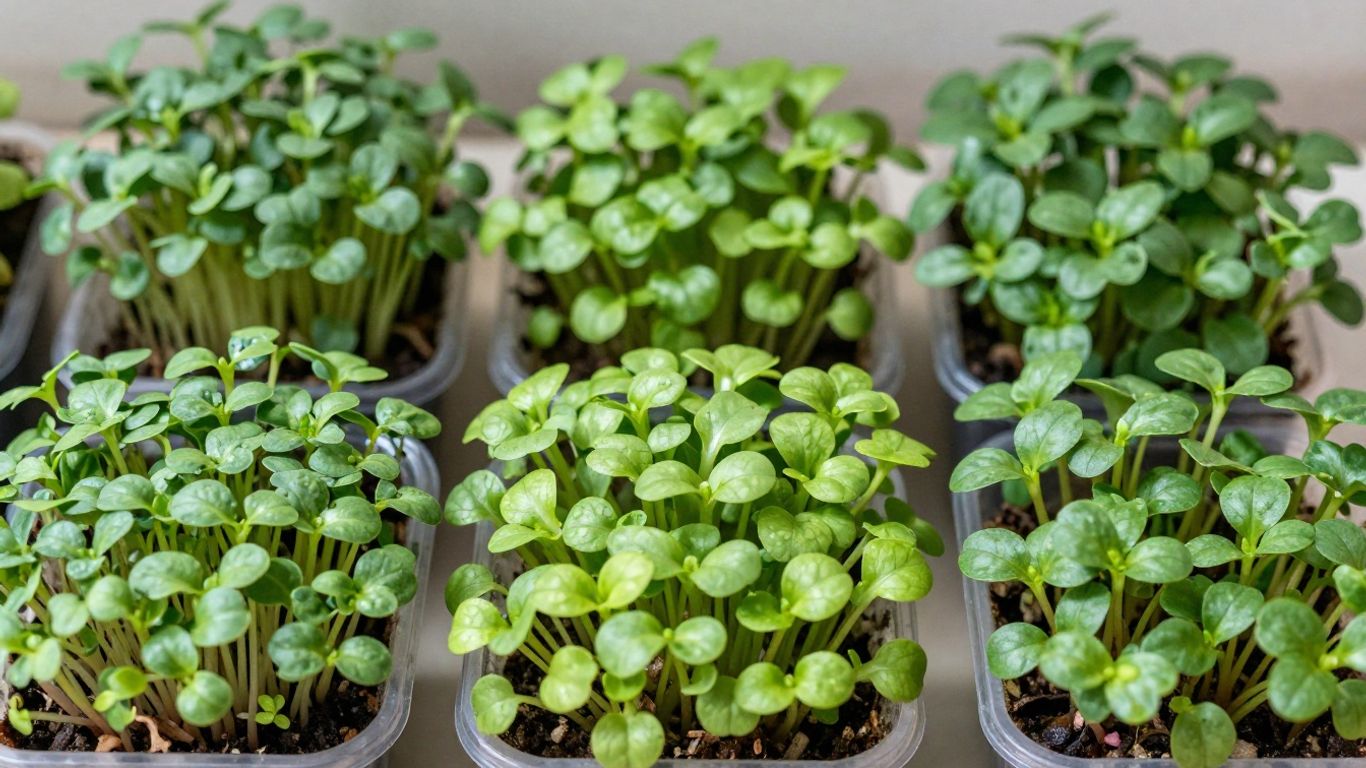
Getting Started with Microgreens at Home
So, you’re ready to jump into the world of growing your own microgreens? That’s awesome! It’s way simpler than you might think, and you don’t need a fancy setup. Honestly, I used to think you needed a whole greenhouse or something, but nope. You can totally do this right on your kitchen counter. It’s a fantastic way to get fresh greens year-round, especially when it’s cold outside and your regular garden is just… well, sleeping.
Essential Equipment for Indoor Growing
When I first started, I was a bit overwhelmed by all the gear people suggested. But really, you only need a few key things to get going. Think of it like this: you need something to grow them in, something to grow them on, and something to keep them watered.
- Trays: You’ll want shallow trays, and drainage holes are your friend here. They stop the soil from getting too soggy, which is a big no-no for microgreens. A standard 10×20 inch tray works great, but if you’re just starting or want to try a few different types, smaller ones are totally fine too. Make sure you have a solid tray without holes to put underneath the one with drainage. This catches all the extra water, saving your countertops from a watery mess.
- Growing Medium: This is what your seeds will sprout in. You can use a good quality potting mix, but make sure it’s lightweight. Some people like using hemp mats or coco coir – these are pretty neat because they’re less messy for indoor growing and you can just toss them in the compost when you’re done.
- Seeds: Of course, you need seeds! We’ll get into choosing them more in a bit, but just know that you can find seeds specifically labeled for microgreens, or you can often use regular vegetable or herb seeds.
- Watering Tool: A simple spray bottle is perfect for gently watering your seedlings, especially when they’re just starting out. You don’t want to blast them with water; a gentle mist is best.
Don’t overthink the equipment. The goal is to provide a stable environment for your seeds to germinate and grow. Simple, functional items will get you started just as well as the most expensive gear.
Choosing the Right Growing Medium
Picking the right stuff for your microgreens to grow in is pretty important. You want something that holds moisture but also drains well. I’ve tried a few things, and here’s what I’ve found:
- Potting Mix: A good, lightweight potting mix is a solid choice. Look for one that doesn’t have huge chunks of bark or perlite. Some mixes are specifically made for microgreens, which can be convenient. I’ve had good luck with mixes that have added mycorrhizae, as it seems to give the plants a little boost.
- Hemp or Jute Mats: These are super popular for indoor growing because they’re really clean and easy to handle. You just lay the mat in your tray, wet it, and plant your seeds. They’re biodegradable, too, which is a nice bonus. They wick water up nicely, keeping things evenly moist.
- Coco Coir: This is made from coconut husks and is a great alternative to soil. It’s lightweight, holds moisture well, and is pretty sustainable. You usually buy it in compressed bricks that you rehydrate with water.
What to avoid? Definitely don’t use soil straight from your garden. It’s usually too dense, can compact easily, and might carry diseases or pests that you really don’t want in your kitchen.
Selecting Your First Microgreen Seeds
This is where the fun really begins! Choosing your seeds is like picking out your first adventure. For beginners, I always suggest starting with something that grows quickly and is pretty forgiving. You want to get that feeling of success early on!
Here are a few types that are great for your first go:
- Radishes: These are super fast growers, usually ready in about 7-10 days. They have a nice peppery kick that’s great in salads.
- Broccoli: Another quick and easy option. Broccoli microgreens are mild and packed with nutrients. They don’t take much longer than radishes to mature.
- Peas: Pea shoots are a bit different – they grow taller and have a lovely, sweet flavor. They do need a bit more space and support as they grow, but they are incredibly rewarding and delicious.
- Sunflower: These are also quite fast and have a nutty flavor. You’ll want to make sure you get hulled sunflower seeds, as the hulls can sometimes get in the way.
When you’re buying seeds, look for ones that are untreated. This means they haven’t been coated with any chemicals. You can often find good deals on larger bags of seeds online if you plan to grow microgreens regularly. It’s way more economical than buying tiny packets from a garden center.
The Growing Process
Preparing Your Trays and Seeds
Getting your trays ready is the first step. You’ll want to fill them with your chosen growing medium, like coco coir or a seed-starting mix, to about an inch or two deep. Make sure the medium is nicely moistened, but not soaking wet. Think damp sponge consistency. Then comes the seeds. For many microgreens, you’ll want to weigh them out to get the right density. Too few seeds and you’ll have sparse growth; too many and they’ll get crowded and might even get moldy. Most seed suppliers give you a guideline for how many grams of seed to use per tray size. For instance, a standard 1020 tray might need around 100 grams of buckwheat, but much less for tiny seeds like basil.
Once your medium is prepped and seeds are weighed, it’s time to sow. Spread the seeds evenly across the surface of the medium. You want a nice, dense layer. After sowing, gently press the seeds into the soil. This is super important for good seed-to-soil contact, which helps them germinate better. Some growers use a second tray filled with weights on top of the sown tray, or a blackout dome. This darkness and gentle pressure mimics what happens in nature and signals to the seeds that it’s time to wake up and grow. This initial stage is all about setting the foundation for healthy seedlings. It’s also a good idea to label your trays with the type of microgreen and the date you planted them. Keeping a simple log or spreadsheet can help you track germination times for different varieties.
Optimal Seeding and Watering Techniques
After sowing and pressing the seeds, the next critical step is watering. You want to keep the seeds consistently moist, especially during germination. A spray bottle is your best friend here. A gentle misting will keep the surface damp without washing away the tiny seeds. Some microgreens, like those with fuzzy seed coats, might need a bit more misting to help them break free from their ‘helmet head’ – that’s when the seed leaves are stuck inside the seed coat. As the seedlings grow, you might switch to a small watering can to water the soil directly, being careful not to disturb the young plants.
Watering frequency depends on your environment – how warm and dry it is. Check the soil daily. If the surface starts to look dry, give it a mist. Overwatering is a common pitfall, leading to fungal issues, so aim for consistently moist, not waterlogged. Remember, different seeds have different needs. Some might need to stay under a blackout dome for a few days, while others can handle light sooner. Always check the specific recommendations for the varieties you’re growing.
The Importance of Light and Airflow
Once your microgreens have germinated and are starting to show their first leaves, they need light. This is when you remove any blackout domes or stacked trays. Place them under a grow light or in a bright, sunny window. Most microgreens thrive with about 12-16 hours of light per day. Too little light and they’ll become leggy and weak; too much direct, intense sun can scorch them. A gentle, indirect light is often best.
Airflow is just as important as light, especially in a home environment. A closed-off room can quickly become humid and warm, creating a perfect breeding ground for mold and other fungal diseases. Using a small fan set on a low setting to circulate air in the room can make a big difference. This gentle breeze helps to dry out the surface of the soil and leaves, reducing the risk of mold and encouraging stronger stem development. It’s a simple step that significantly improves the health of your microgreens and helps prevent common growing problems. You want to create an environment that mimics a gentle outdoor breeze, not a wind tunnel.
Cultivating Specific Microgreen Varieties
Growing microgreens at home opens up a world of flavors, colors, and textures. Once you’ve set up your basic growing supplies, it’s time to look closer at which microgreens to grow, how their care differs, and what to expect from each type. Picking the right variety will add something special to your meals and make the growing process more satisfying.
Fast-Growing Options for Beginners
If you’re new to microgreens, start with the most reliable and speedy growers. These varieties usually sprout quickly and provide a harvest within one to two weeks, making them perfect for those just starting.
Some top beginner choices include:
- Radish: Quick-growing, bold flavor, easy to sprout.
- Broccoli: Mild and familiar taste, usually harvestable in 7-10 days.
- Mustard: Peppery flavor, adds color and zing.
- Red Clover: Fresh, sweet flavor and grows dense mats fast.
Here’s a quick look at how long some popular beginner varieties take to harvest:
| Variety | Average Days to Harvest |
|---|---|
| Radish | 7-10 |
| Broccoli | 8-10 |
| Mustard | 8-12 |
| Clover | 8-12 |
Don’t rush—let your microgreens develop firm stems and large cotyledons for the best yield and flavor, even on these quick growers.
Flavorful Choices for Culinary Exploration
Once you’ve grown a few crops, you may want to experiment with microgreens that bring strong flavors, unique textures, or stunning colors. These varieties are favorites of chefs and food enthusiasts who want variety in their home harvests.
Consider trying these:
- Cilantro: Intense, fresh flavor, perfect for salsas and Asian cuisine.
- Amaranth: Delicate texture and bold reddish-pink color.
- Daikon Radish: Spicy, crunchy, great for sandwiches and salads.
- Pea Shoots: Sweet, crispy, with a taste like fresh garden peas.
- Chard (Rainbow or Ruby): Offers a splash of color and a mild earthy taste.
Mixing varieties is fun, but make sure their growth rates are similar, or harvest timing may get tricky.
Tips for Challenging Varieties
Some microgreens require a bit more patience and attention. They might grow slower, need specific conditions, or be picky about watering and humidity. But the results are often worth the fuss.
- Chives and Onions: These are slow to sprout (up to three weeks) and need steady moisture. Use soil instead of hydroponics for the best results.
- Cilantro: Soak the seeds before sowing, cover them lightly with soil, and keep things a bit cool—under 70°F is good.
- Basil: Sensitive to cold and damp, needs warmth and good airflow. Overwatering will lead to mold problems.
Try these steps with any challenging variety:
- Follow presoak and temperature recommendations closely.
- Provide enough airflow—use a small fan if needed.
- Monitor water levels carefully; don’t let trays get soggy.
Even the trickiest microgreens become easier with practice. Tweak your setup as you go and you’ll find what works best for you.
Mastering the Harvest
Harvesting microgreens is not just about cutting your greens—it’s about timing, technique, and knowing what stage to cut for the best flavor and nutrition. Let’s dig into the details, so you can get the most from your homegrown crop.
When to Harvest Your Microgreens
The best time to harvest microgreens is when their first true leaves have appeared, usually 7 to 21 days after planting. The little round leaves that appear first are the cotyledons—these are the “baby” leaves that sprout just before real leaves grow. Wait for at least one set of real leaves to form; these are more textured and resemble what the adult plant’s leaves will look like. Picking at this stage means you get the freshest flavor and peak nutrition. If you wait much longer, the plants may get tough or bitter.
Characteristics to check before harvesting:
- Height: Most microgreens are ready at 1 to 3 inches tall.
- Leaf stage: First pair of true leaves is visible (not just cotyledons).
- Color: Leaves are vibrant and the stems look juicy.
Proper Harvesting Techniques
When you’re ready, follow these steps for a smooth harvest:
- Grab a pair of sharp scissors or a clean knife. Dull blades can bruise the stems, which might lead to quicker spoilage.
- Hold the greens upright with one hand and snip just above the soil or growing medium. Never pull the roots up—you’ll end up with dirt and roots that are hard to clean.
- Collect the cut greens in a clean bowl. Gently rinse them with cool water and lay them on a paper towel or use a salad spinner to dry.
- Only wash what you’ll eat that day if possible—extra moisture can cause your stored greens to spoil faster.
Table: Harvest Time for Common Microgreens
| Variety | Typical Harvest (Days) | Key Sign of Readiness |
|---|---|---|
| Radish | 7-10 | True leaves, spicy aroma |
| Sunflower | 8-12 | Sturdy, thick stems |
| Broccoli | 8-12 | First true leaves, mild scent |
| Pea Shoots | 10-14 | Tendrils, balanced height |
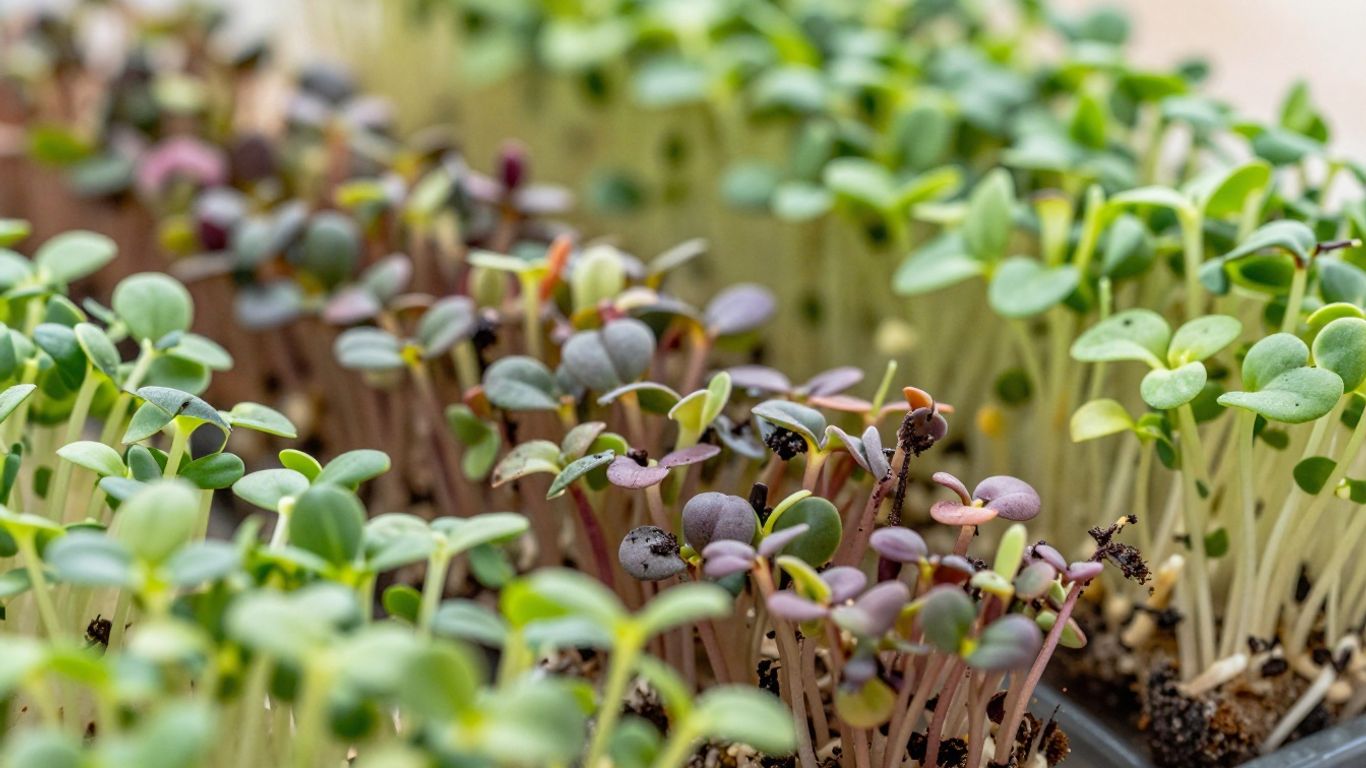
Understanding True Leaves vs. Cotyledons
At first, every microgreen sends out cotyledons: those smooth, rounded starter leaves. They’re the plant’s energy reserve coming to life. After a week or more (depending on type), you’ll spot the true leaves—these actually look like miniature versions of what the plant will grow outside in the garden.
True leaves signal that the plant is at its peak for both taste and nutrition.
- Cotyledons: Smooth, oval, usually emerge in a pair
- True Leaves: Shaped more like the mature plant, often textured and more deeply colored
Harvesting at the true leaf stage gives you maximum flavor and nutrients without letting your greens get woody or overly fibrous. It’s a short window, but worth catching.
Whether this is your first harvest or your hundredth, taking a little extra care makes all the difference in flavor and freshness. There’s nothing quite like snipping off your own microgreens just minutes before your meal.
Storing Your Freshly Harvested Microgreens
So, you’ve successfully grown and harvested your microgreens. That’s fantastic! Now, the trick is to keep them fresh and tasty for as long as possible. While they’re definitely best eaten right after harvesting, you can extend their life for about a week with a little care. It’s all about managing moisture and air.
Maximizing Freshness with Proper Storage
Think of your microgreens like delicate salad greens. They don’t like to be too wet, and they don’t like to be crushed. The goal is to create an environment where they can stay crisp without wilting or getting slimy. This usually means keeping them cool and preventing excess moisture from building up.
Airtight Containers and Refrigeration
Refrigeration is your best friend when it comes to storing microgreens. The cold temperature slows down their metabolism, keeping them fresh longer. For storage, you’ll want to use a container that can seal well. This helps maintain a consistent environment and prevents them from drying out or picking up odors from other foods in your fridge.
Here are a few container options that work well:
- Clamshell Containers: These are often used for store-bought greens and are great for smaller harvests. Many are compostable, which is a nice bonus.
- Repurposed Grocery Store Containers: Don’t throw away those clear plastic containers from pre-washed salads or berries! Wash them out thoroughly; they often have built-in ventilation and are perfect for microgreens.
- Airtight Food Storage Containers: Standard reusable containers work well. Just make sure they have a good seal.
- Glass Jars: If you use jars, consider placing a folded paper towel at the bottom to absorb extra moisture. You can secure a piece of cheesecloth or a paper towel with the jar’s ring instead of a solid lid to allow for some air exchange.
When placing your microgreens in the container, try not to pack them too tightly. This can bruise the delicate leaves and stems. If you’re using a container that might have a bit too much moisture, you can add a dry paper towel on top of the greens to help wick away excess humidity.
The key to keeping microgreens fresh is a balance between preventing dehydration and avoiding excess moisture. A cool, humid-free environment is ideal.
Labeling for Optimal Tracking
It’s easy to forget what you’ve harvested and when, especially if you’re growing multiple varieties. Labeling your containers is a simple step that makes a big difference. Write down the type of microgreen and the date you harvested and stored it. This helps you use the oldest ones first and ensures you’re always enjoying your greens at their peak freshness. You can use simple masking tape and a marker, or get fancy with some cute produce labels. Whatever works for you, just make sure it’s legible!
Incorporating Microgreens into Your Diet
So, you’ve grown these tiny, vibrant greens right in your own home. Now what? The best part about microgreens is how easy they are to add to just about anything. They’re not just pretty; they pack a serious flavor punch and a load of nutrients into a small package. Think of them as super-concentrated versions of their mature selves.
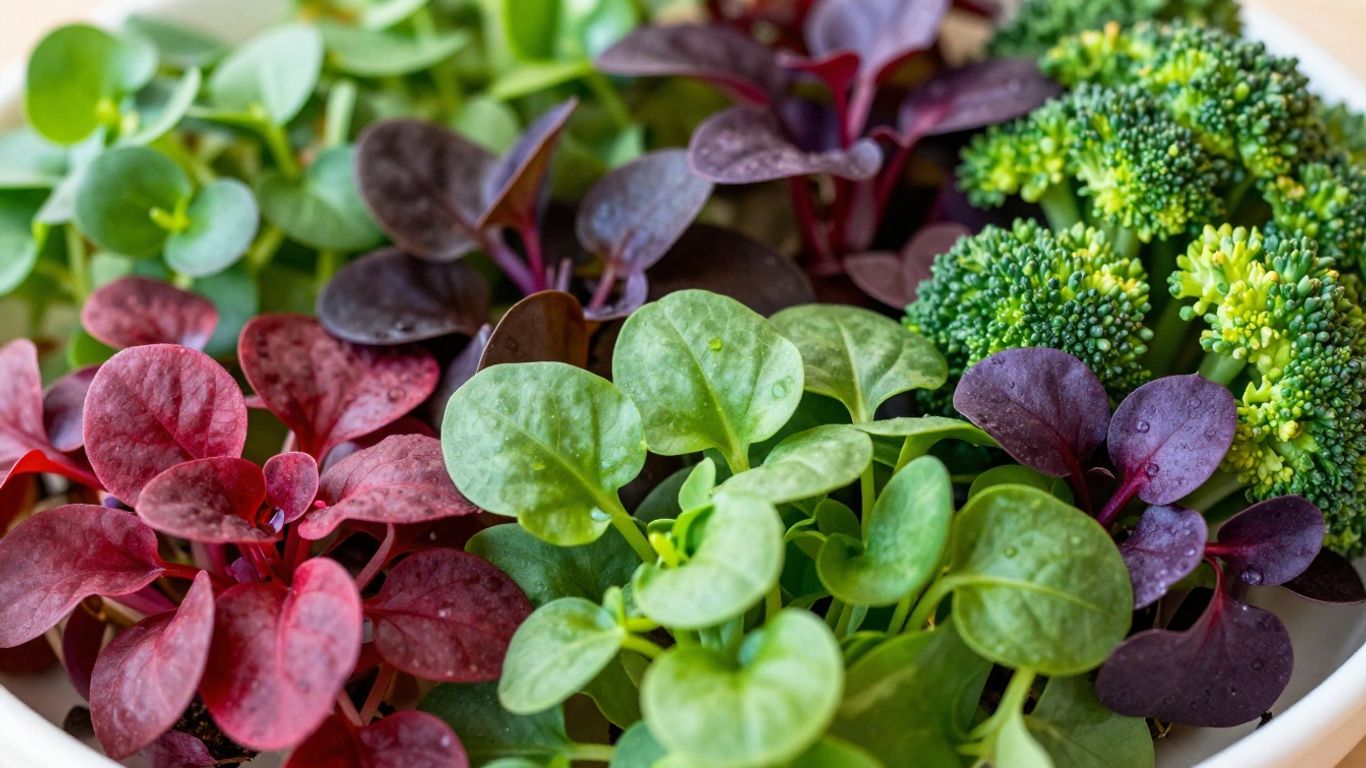
Flavor Profiles and Culinary Pairings
Each type of microgreen brings its own unique taste to the table. Radish microgreens, for instance, offer a peppery kick, similar to a mature radish but more refined. Sunflower microgreens have a nutty, slightly earthy flavor that’s really satisfying. If you’re into milder tastes, pea shoots are a great option, offering a fresh, sweet, and slightly vegetal note. Broccoli microgreens are pretty mild too, with a subtle cruciferous flavor.
Here’s a quick look at some common microgreens and their taste profiles:
- Radish: Peppery, spicy
- Sunflower: Nutty, earthy
- Pea Shoots: Sweet, fresh, vegetal
- Broccoli: Mild, slightly cruciferous
- Arugula: Sharp, peppery
- Beet: Earthy, slightly sweet
Experimenting with different varieties is half the fun, and you’ll quickly discover which ones complement your favorite dishes best.
Adding Microgreens to Salads and Soups
Salads are an obvious place to start. Instead of just lettuce, mix in a generous handful of your homegrown microgreens. They add texture, color, and a burst of flavor that can transform a simple salad into something special. Try combining peppery radish microgreens with a creamy dressing, or use nutty sunflower microgreens as a base for a heartier salad.
For soups, microgreens are best added right at the end, just before serving. A sprinkle of fresh microgreens on top of a hot soup adds a vibrant contrast in both temperature and flavor. Imagine a steaming bowl of lentil soup topped with bright green, slightly spicy radish microgreens, or a creamy tomato soup garnished with delicate pea shoots. It makes the dish look and taste so much more appealing.
Creative Uses for Sandwiches and Smoothies
Don’t stop at salads and soups! Microgreens can really liven up sandwiches and wraps. Layer them on instead of, or in addition to, traditional lettuce or sprouts. They add a fresh crunch and a concentrated flavor that makes your sandwich more interesting. Think about adding some spicy arugula microgreens to a turkey sandwich or some mild beet microgreens to a veggie wrap.
Smoothies are another fantastic avenue. While you might not think of greens for a smoothie, microgreens blend in surprisingly well, especially milder varieties like pea shoots or sunflower. They boost the nutritional content without drastically altering the taste, giving you an extra dose of vitamins and minerals. Just toss a small handful into your blender with your usual fruits and liquids. It’s a simple way to get more greens into your diet without even noticing!
Microgreens are a fantastic way to boost the nutritional value of almost any meal. Their concentrated flavors and vibrant colors make them a versatile ingredient that can be used in countless dishes, from simple snacks to more elaborate meals. Don’t be afraid to get creative and see where these tiny powerhouses can take your cooking.
Troubleshooting Common Growing Issues
Growing microgreens at home is rewarding, but sometimes things don’t go as planned. Issues with germination, mold, or pests can pop up even if you follow instructions carefully. Here’s how to work through the most common problems so you can get back to a healthy, thriving tray.
Addressing Poor Germination Rates
Slow or spotty sprouting can make anyone question their technique, but the fix is usually simple. Here’s what you should check:
- Seed quality: Use only fresh, high-quality, untreated seeds for best results.
- Seeding density: Too many or too few seeds can cause uneven trays. Use a small scale to weigh seeds before planting.
- Moisture: Soil should be damp but not soggy. Misting is great for the first few days; don’t let seeds dry out.
- Temperature: Most microgreens prefer temperatures in the 65–75°F range during germination.
If most of your microgreens failed to sprout, don’t be discouraged. Adjust one variable at a time—like seeding density or moisture—so you know what made the difference next time.
Preventing Mold and Fungal Problems
Mold is the most common headache for new growers. It thrives in overly humid, still conditions and often looks like fuzzy white growth at the soil line.
Try these steps to reduce the risk:
- Use trays with drainage holes and never let water pool at the bottom.
- Switch to bottom-watering once the seeds sprout so foliage stays dry.
- Keep the air moving with a small fan. Even a ceiling fan can help.
- Don’t seed too densely; crowded seedlings invite trouble.
- Be alert for musty smells or visible fuzz; harvest clean portions immediately if they appear.
| Problem Area | Solution Suggestions |
|---|---|
| Humidity | Increase airflow, use a fan |
| Overwatering | Water less frequently, bottom-water |
| Seed Crowding | Reduce seed density per tray |
Dealing with Pests and Diseases
Most indoor microgreen crops have fewer pest problems than an outdoor garden, but you might still run into trouble. Here’s how to manage it:
- Check trays daily. Catching problems early makes a big difference.
- Remove any trays that seem badly affected—don’t risk spreading issues by keeping them close to healthy plants.
- Keep your workspace clean and avoid using garden soil, which can contain gnats and disease.
If you see tiny bugs (like fungus gnats), try letting the medium dry a bit more between watering sessions and put out sticky traps if needed.
Treat pest or disease outbreaks as an opportunity to adjust your routine, not just a setback. Clean trays thoroughly between plantings, and you’ll avoid most major problems next time around.
The Rewards of Homegrown Microgreens
Growing your own microgreens at home offers a surprising number of benefits, turning a small indoor space into a source of fresh, nutritious food year-round. It’s a fantastic way to bring a bit of the garden inside, especially when the weather outside isn’t cooperating.
Year-Round Gardening and Fresh Produce
One of the biggest perks is the ability to have fresh greens no matter the season. Forget waiting for spring or dealing with frozen soil; your microgreens can be ready to harvest in just a few weeks, providing a vibrant splash of green and flavor to your meals even in the dead of winter. It’s like having a mini-garden right on your windowsill, offering a constant supply of healthy additions to your diet.
Cost-Effectiveness and Sustainability
When you compare the price of buying microgreens at the store to growing them yourself, the savings can add up quickly. A small packet of seeds can produce a substantial amount of greens, often costing significantly less than pre-packaged varieties. Plus, by growing what you need, you reduce food waste and the carbon footprint associated with transporting produce. It’s a small step towards a more sustainable kitchen.
The Joy of Nurturing Your Own Food
There’s a unique satisfaction that comes from nurturing something from a tiny seed to a harvestable plant. Watching those little seedlings emerge and grow, knowing you provided the right conditions for them, is incredibly rewarding. It connects you to your food in a way that simply buying it from the grocery store can’t. It’s a simple, accessible hobby that brings a sense of accomplishment and a touch of nature into your home.
Growing your own microgreens at home is a fantastic way to add fresh, healthy greens to your meals. These tiny plants pack a big nutritional punch and are surprisingly easy to cultivate, even in small spaces. Imagine snipping vibrant, flavorful greens right from your windowsill to top your salads or sandwiches! Ready to start your own mini-garden? Visit our website to learn more about the amazing benefits and get started today!
Conclusion
Growing microgreens at home is one of those projects that’s simple to start and surprisingly rewarding. You don’t need a lot of space, fancy tools, or even much experience. Just a tray, some seeds, a bit of soil, and a sunny spot will do the trick. In a week or two, you’ll have fresh greens ready to snip and toss onto your meals. The flavors are bold, the colors are bright, and it’s hard not to feel a little proud when you see those tiny leaves pop up. Whether you’re looking to add more nutrition to your diet or just want something green to care for during the winter, microgreens are a great choice. Give it a try—your salads, sandwiches, and even your mood might thank you.
Frequently Asked Questions
What exactly are microgreens?
Microgreens are basically baby plants! They are very young vegetable or herb seedlings that we harvest when they’re just a few inches tall, usually after they’ve grown their first set of
How are microgreens different from sprouts?
It’s easy to mix them up, but sprouts are grown in water and you eat the whole thing – root, seed, and all. Microgreens, on the other hand, are grown in soil or a similar material, and we only eat the tasty leaves and stems. They’re a bit more mature than sprouts.
Why are microgreens considered so healthy?
These little greens pack a big nutritional punch! They contain lots of vitamins and minerals, sometimes even more than their full-grown veggie counterparts. Think of them as a super-concentrated dose of goodness.
When is the best time to harvest microgreens?
You’ll want to harvest them when they have their first set of ‘true leaves’ – the ones that look like the actual plant they’ll grow into. This usually happens about 1 to 3 weeks after you plant the seeds, depending on the type.
How should I store my harvested microgreens?
To keep them fresh, store your microgreens in an airtight container in the refrigerator. They’re best eaten within a week, but proper storage can help them last that long. It’s also helpful to label the container with the date!
What’s the easiest way to use microgreens in meals?
They’re super versatile! You can toss them into salads, sprinkle them on top of soups or sandwiches, or even blend them into smoothies for an extra boost of nutrients and flavor. They add a fresh, vibrant touch to almost anything.
What are some common problems when growing microgreens?
Sometimes seeds don’t sprout well, or you might see mold if there’s too much moisture. Pests can also be an issue, though less common indoors. Making sure you have good airflow and don’t overwater can prevent many of these problems.
Can I really grow microgreens all year round?
Absolutely! That’s one of the best things about microgreens. You can grow them indoors anytime, even when it’s cold outside. They don’t need much space and can provide you with fresh greens no matter the season.